Images
When placing images on the web, be thoughtful about the size, file name, and alt text.
WebP Image Format
UND recommends switching from JPEG to WebP image files. WebP allows websites to display high-quality images with smaller file sizes and faster load times.
WebP files can not be used in image gallery assets. Use JPEG.
Editing Photos
WebP files cannot be edited in Omni like PNG and JPEG files. Photoshop is the preferred method to create WebP files and is available in Adobe Photoshop 23.2 or later. If you do not have Photoshop, use one of these a free WebP converter like Pixelied or Convertio.
How to Size Photos in Photoshop
- Open Photoshop
- Click “File” in the top tool bar
- Scroll down and click “Open”
- A File Explorer window will pop up where you will select your image
- Once selected, click “Open”
- Once your image is uploaded, now click “Image” in the top tool bar
- Scroll down to “Image Size”
- Resize image to the size you need
- Input 72 in Resolution
- Click “OK”
- Click “File” in the top tool bar
- Scroll down to “Save As A Copy”
- A File Explorer window will pop up for where you want to save and name your file, and choose your file type
- Choose where you want your file saved
- Name your file
- Under “Save as type”, Scroll down and select “WebP” in Format
- Click “Save”
- A new Photoshop window will pop up, “WebP Options”
- For image compression:
- Select “Lossy”
- Enter 70 for Quality – or lower if your image is not below 100 KB
- Click “OK”
Image File Size Tips
- Large image file sizes impact page load time. This leads to a frustrating experience for end users and negatively impacts how the page will rank in search engines.
- Our site relies heavily on images, so every kilobyte saved impacts end user experience, usability, and site performance. Especially on mobile devices and networks with reduced speed or limited reception.
- Always save images to 72 dpi. This is the lowest resolution recommended.
How to Write Photo Alt Tags
Every image is required to have alt text (alternative text) to describe what the image is for those using a screen reader. Alt text also helps search engines index images.
- Be concise but descriptive: For example, a headshot of John Doe should read “Headshot of John Doe” to tell what
type of photo it is and who is in the photo. Only including the person’s name doesn’t
describe the type of photo it is. Refrain from stating a picture is a picture.
- Incorrect: Merrifield Hall picture
- Correct: close-up of Merrifield Hall entry
- Do not use the image file name as the alt tag.
- Incorrect: picunion1_large.jpg
- Correct: Front door of the UND Memorial Union
- Avoid images with text: Images with text create significant accessibility issues. If you have no other option, be sure to provide detailed alt text, captions, or a nearby description.
- Do not write alt text for decorative elements: If the image is not a photograph, does not contain text, and serves only as a decoration, use a single space character as its alt tag so that screen readers will skip it silently.
- Be careful of hyperlinked images: If the image is linked the alt text should describe the link destination rather than
what is represented in the image.
- Incorrect: Three students in front of the library.
- Correct: Read student success stories.
Saving and Naming Images
Photos must be saved in the “_files > images” folder to help with long-term site maintenance.
Follow UND's photo naming conventions for file names.
Hero and Billboard Files Sizes
| Response | File Size | Rational and Recommendations |
|---|---|---|
| Accept | 200KB or less | Always aim for this level of optimization. |
| Question | 200KB ‑ 350KB |
|
| Reject | 350KB+ | Image is too large and must not be used. |
Medium Image Files Sizes
Images with dimensions around 600x400 are considered medium.
| Response | File Size | Rational and Recommendations |
|---|---|---|
| Accept | 75KB or less | Always aim for this level of optimization. |
| Question | 75KB ‑ 110KB |
|
| Reject | 110KB+ | Image is too large and must not be used. |
Universal Template Image Specs

| Snippet | Image Pixel Size |
|---|---|
| Billboard | 1920x640 |
| Mobile Billboard | 768x256 |
| Social | 520x347 |
| Sidebar Feature | 330x220 |
| Image | 1024x683 |
| Image (inline) | 268x400 |
| Video | 1024x576 |
| People | 344x412 |
| Feature | 300x300 |
| Gallery | 1024x576 |
College Template Image Specs
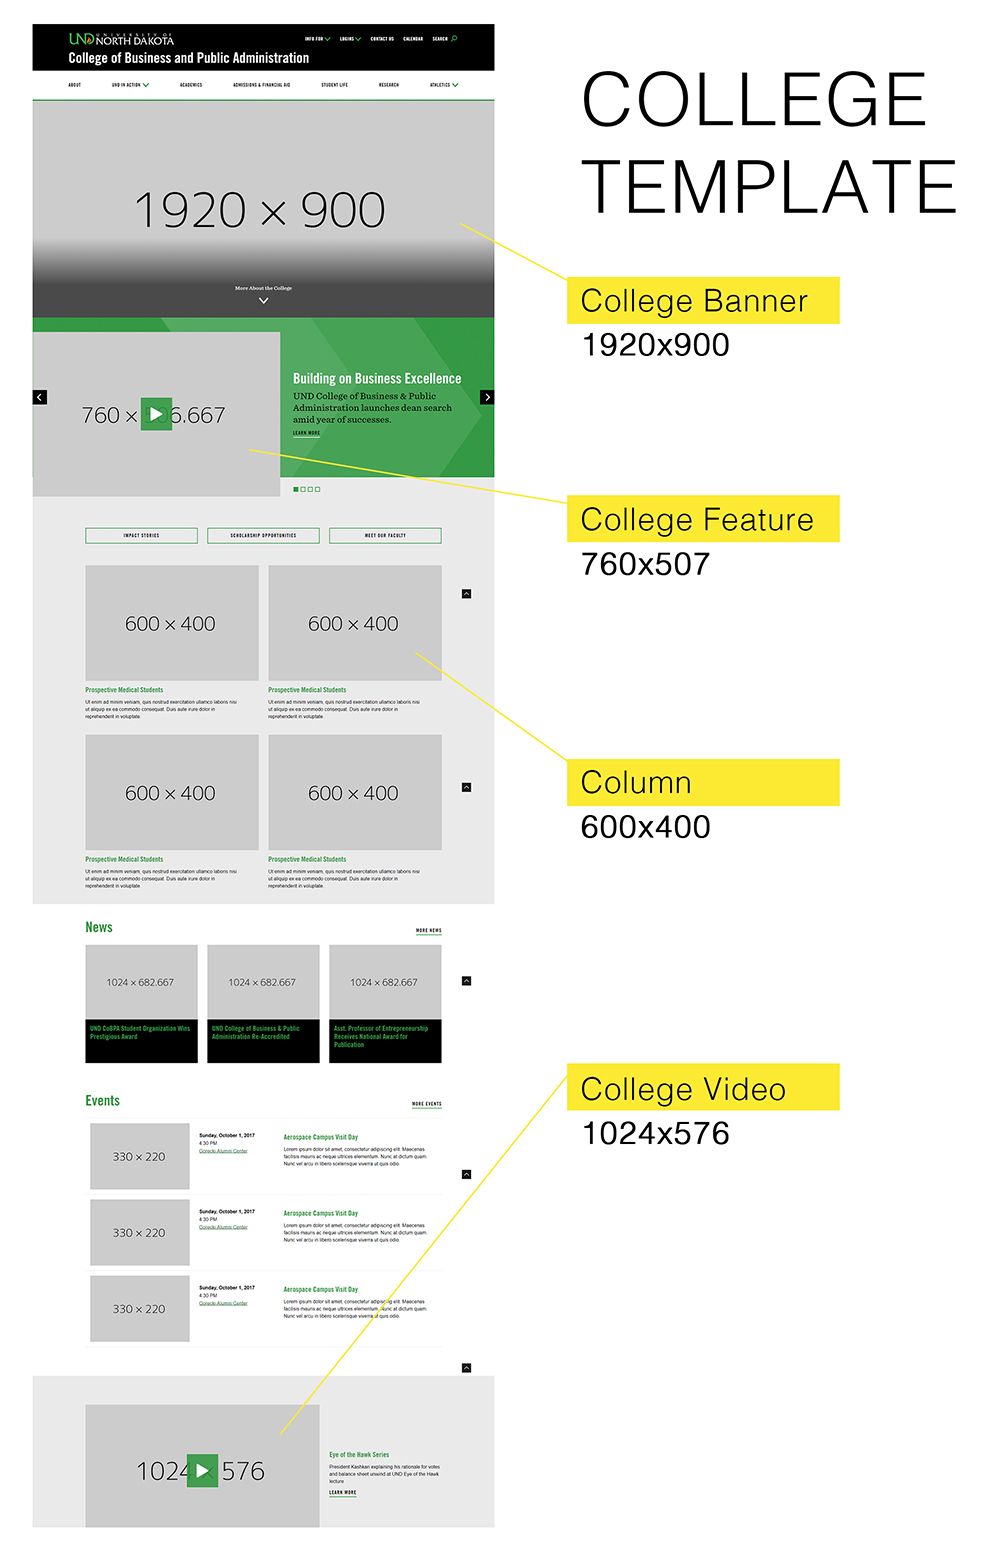
| Snippet | Image Pixel Size |
|---|---|
| College Banner | 1920x900 |
| Mobile Banner | 768x960 |
| College Feature | 760x507 |
| Column | 600x400 |
| Video | 1024x576 |
Landing Page Template Image Specs
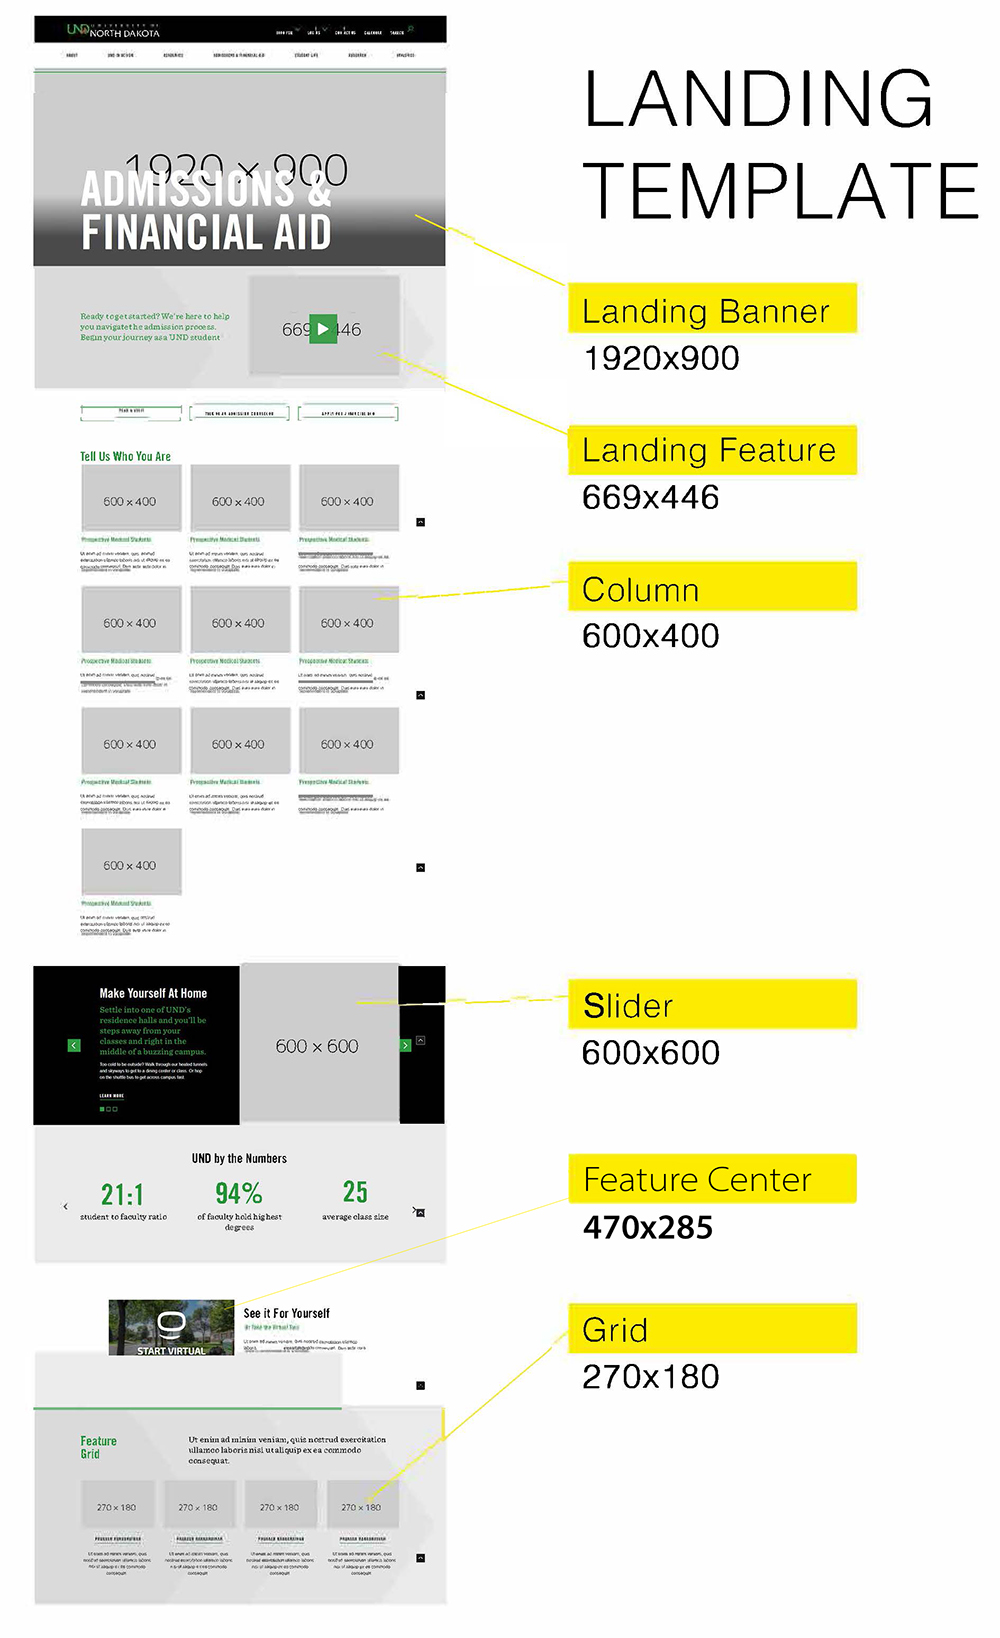
| Snippet | Image Pixel Size |
|---|---|
| Landing Banner | 1920x900 |
| Mobile Banner | 768x960 |
| Landing Feature | 669x446 |
| Column | 600x400 |
| Slider | 600x600 |
| Feature Center | 470x285 |
| Grid | 270x180 |
UND Photo Gallery
We strongly encourage the use of UND professional photos instead of stock photos or amateur photos.
The UND Photo Gallery is available for general use with a UND login via Canto. Additional archived photography can be requested by emailing marketing@UND.edu.