WordPress Theme
WordPress Requirements
The UND blog theme uses the Classic Editor and Classic Widgets for WYSIWYG editing and widget management. In general, the Block Editor and blocks are not supported since the theme was developed when blocks were relatively new.
If a blog owner wants to use the Block Editor, they should consult with the Web Team to determine feasibility as it may produce unexpected results.
In almost all cases it is best to follow any provided documentation or help text related to proper image size prior to uploading. It is recommend that users not use WordPress to crop/edit images.
Plugins Required by Theme
Blog managers should not customize the configuration of these plugins.
- Advanced Custom Fields Pro
- Advanced Editor Tools
- Classic Editor
- Classic Widgets
- Yoast SEO
Supported Blog Plugins (Optional)
The following plugins will be activated on a per blog basis. These plugins are not necessary for the theme to function. The plugins are marked as “supported” because they have been tested with the blog theme to ensure a unified UND web presence.
- MailPoet 3: Newsletters and subscription forms for newsletters.
- User Submitted Posts: Allows users to submit posts for a blog to publish.
- WP Show Posts: Provides filtered post, page, and category listings.
If a blog requires functionality provided by one of the plugins above, please contact
Marketing to activate and configure. There are specific settings that need to be applied
before blog owners
can begin using them.
Admin Plugins
If a plugin appears in the Plugins section of the WordPress admin, and is not listed above, it is a plugin used by WordPress administrators. Blog owners should not attempt change the configuration of these plugins.
Configured under Appearance > Menus.
Three menu locations are used by the UND Blog theme; Primary Navigation, Footer Menu 1, and Footer Menu 2.
Please use the WordPress Menu User Guide for assistance on creating a menu in WordPress.
This is the blog's primary navigation menu. It is displayed horizontally and below the Site Billboard on desktop viewports.
Nested items are allowed and will appear as a dropdown, but only the first sub-level will display.
This menu should link to pages, posts, or categories within the blog and should not link to different websites (including other UND websites).
It is best practice not to include the homepage in your menus. Users are more likely to use the Site Title, logo, or breadcrumbs to navigate back to the homepage.
Menus
Only one level of navigation is supported. Nested links will not display. Both menus can include links in any order, including external sites and other UND pages.
- Menu 1: Appears in the second column of the three-column footer, to the right of the footer heading and/or contact information.
- Menu 2: Appears in the third column of the footer, to the right of Menu 1.
Widgets
Configured under Appearance> Widgets.
Widgets are a great way to add content to the sidebar of the UND Blog theme. The following widgets are officially supported by the UND Blog theme. Widgets with the UND prefix are custom to the UND Blog theme.
- Archives
- Categories
- Custom HTML
- Image
- MailPoet 3 Form (if enabled for the blog)
- Meta
- Pages
- Recent Posts
- Text
- UND: Social Media Links
- UND: Tag List
Widgets outside of this list, like widgets enabled by a blog specific plugin, may not create a unified UND web presence or fail to meet accessibility requirements. Blog managers are encouraged to consult with the Web Team before using unsupported widgets.
Authors

Prior to displaying authors on a site, the following setup should be performed for all authors that will be displayed on a site. Authors are configured in Users by editing the desired user. Example of author content block that is displayed when author display is enabled. When you edit a user, you will be taken to the user’s profile page. Configure the following:
- Ensure that First Name and Last Name are provided.
- Use the Display name publicly as dropdown to select the option showing First Name and Last Name.
- Set the Biographical info field under About Yourself.
- Be mindful that the author’s proper name will be displayed first and lead into the biographical information. It will read, “Joe is a world renowned author.” If the Biographical info field entry is “A ten time best selling author”, it will be displayed as “Joe A ten time best selling author.”
- Set an image for Author Image und Author Image.
- This section of the user profile is meant to display the author image on posts and pages.
- The user profile page also has a section called Profie Picture. The Profile Picture is primarily displayed as the small user picture in a Comments section of posts or in the WordPress admin. The Profile Picture tends to be small and of poor quality which is why the UND Blog theme provides a custom Author Image option which displays a high quality image.
Author display can be controlled two ways, at site level and post level. Post level author settings have precedence.
Site Level
Configured under Site Options > Theme Options > Author Display.
- Default is unchecked.
- When checked, authors will be displayed on all posts sitewide unless overridden by the post level Author Display setting.
Post Level
Configured on the Post Edit admin page in the Display Author metabox on the right side of the admin page.
- Default is set to Default.
- Options
- Default: Uses the site level value defined in Site Options > Theme Options > Author Display.
- Show: Shows the post author, ignoring the site level setting.
- Hide: Hides the post author, ignoring the site level setting.
Theme Settings
To setup your blog, use the below settings. Configure under Settings > General.
Site Title
- This is the blog title and the heading for the Site Billboard. This is displayed in search results, the browser’s tab and window bar, and various locations in the UND Blog theme.
- A good Site Title is required. Header display of the Site Title can be configured in Site Options >Header > Site Billboard > Style.
Tagline
- One to two short sentences that will be appended to the blog title and appear below the heading on the Site Billboard.
- A Tagline is not required but highly recommended. Header display of the Tagline can be configured in Site Options > Header > Site Billboard > Tagline.
Administration Email Address
This should be set to the Blog Manager’s UND email address. Detailed information can be found in the WordPress Settings > General Screen documentation.
The email address must be able to be monitored and needs to be confirmed when changed.
This address serves multiple purposes.
- Comment moderation and notifications.
- Blog membership and user management.
- Notifications about automatic Wordpress updates
The email address is set at Settings > General > Administration Email Address.
The settings to toggle email notification related to comments is Settings > Discussion > Email me whenever. Unchecking these should prevent UND.blogs@UKND.edu from getting email notifications related to comments. Word of caution. Are you the only one receiving email from UND.blogs@UND.edu? If not, unchecking these settings would prevent others from getting notified via email and might interfere with how they manage and moderate comments. They would then have to login regularly to see if there are any comments for moderation.
If no one is, or has been, moderating comments, then turn off comments at Settings > Discussion > Default post settings > Allow people to submit comments on new posts. This won’t change for existing posts that have allowed comments and can be overridden at the post level to allow comments.
Reading/Homepage Display
Configure under Settings > Reading. WordPress sites generally have two homepage types.
- The most common option is to use “Your latest posts” to display excerpts of recent posts.
- The other is to point to a specific WordPress page.
For blogs that create posts and are not being used exclusively as a newsletter service, the Your latest posts option should suffice for the homepage. This option uses a fixed template and content cannot be added to the body of the page. If custom content needs to be configured, then use the Static Page option instead.
- Homepage: Makes a specific page the homepage instead of using the default homepage template
that is applied at the root of the site. This will allow some minor customization
for the homepage, but features like the Featured Posts Slider and the stylised list
of posts will no longer be available.
- Because of some non-obvious defaults and inheritance by WordPress, it is recommended that this field be set anytime the Static Page option is being used.
- Posts Page: This field is optional when the Static Page option is selected. This setting will
apply the homepage template to a specific page (the inverse of what the Homepage field
does). If it is not desired to use the homepage template on the site, then leave this
field blank.
- If Homepage is not set when this field is set, the homepage template will be applied to the page that has been selected and to the root of the site (as nothing has been assigned to be the homepage, and thus the homepage template will be rendered - this is the default behavior of WordPress).
- The homepage template cannot be set on the page admin screen, only here at Settings > Reading > Your Homepage display.
Discussion
Configured under Settings > Discussion. This is where comments can be configured for the site.
Allowing comments is encouraged on blogs because they allow you to engage with your audience. By default, all comments will require the administrator's approval before posting. If you change this setting to allow comments without approval, please understand that spam may become an issue. Creating a blog moderation policy is also encouraged. Have a consistent and clearly-stated approach for all comments to help promote trust with your blog's audience. There are a number of online resources you can turn to for information on blog moderation policies.
If no one is moderating comments, then comments should be turned off altogether. This can be set at Settings > Discussion > Default post settings > Allow people to submit comments on new posts.
- This won’t change for existing posts that have allowed comments and can be overridden at the post level to allow comments.
- You may wish to disable comments in bulk for existing posts. To do this please follow the WordPress documentation on bulk editing posts.
Comment replys are limited to a maximum depth of two. This limitation is controlled at the template level. As a result, the setting for comment depth will be ignored if it exceeds the value of two.
Plugin Settings
In general, blog owners should not configure plugins without the guidance of Marketing or UIT.
Site Options
Found in the left admin sidebar as Site Options.
- Site Options are UND theme specific settings. While none of the Site Options settings are required in order for the theme to work, it is a good idea to be aware of what settings/options are available and their defaults.
- Site Options groups settings into the following six tabs: Theme Options, Header, Footer, Sidebar, Social Media Links, and Featured Posts Slider.
Theme Options
Theme Color
Select a theme color for the site. By default, most color accents are UND green (#009a44). Three colors are available:
- Blue (#213f7b)
- Brown (#9b7b56)
- Maroon (#a90533)
Display Author
Check to allow the display of authors on posts across the site. Display of post authors can be controlled at the post level to override this sitewide setting.
Header: Site Billboard
The Site Billboard is a site-wide hero image type feature. Site owners can select from the following three options. While not enforced, it is highly recommended that image dimension recommendations be followed to limit undesirable outcomes as much as possible. When selecting an image:
- DO NOT place descriptive text in this image! No sentences, paragraphs, bulleted lists, etc. The only text that is allowed in the image is the site title.
- Logos are allowed.
- Ensure the background image is not too light and that there is proper contrast between Site Title/Tagline and the background image so that the text is legible.
It is also highly recommended to provide both a desktop and mobile image. Why? If
a Site Billboard is used to display a logo, the logo may be too small to read if the
desktop image is displayed on mobile screen sizes. Similar effects can happen to image
content. Providing a
"close up" version or alternative imagery for mobile viewports can make the Site Billboard
more appealing on those smaller viewports.
Style
Sets one of the three available options.
- Text Only: Text with a predefined background of theme colored arrows.
- Image Only: User defined background image only.
- Image with Text: Text with user defined background image.
The text displayed in the Site Billboard is the Site Title and Site Tagline defined in Settings >General.
Show Tagline
When checked, will display the Site Tagline in the Site Billboard. Site Tagline will appear below the Site Title.
- Site Tagline is set in Settings > General > Tagline.
Desktop Image
Required if using the Image Only or Image with Text Style. Displayed on medium to large screen sizes.
- Image Size, 1920px x 640px.
Mobile Image
Optional. But highly encouraged. Displayed on smaller screen sizes.
Width and height are variable, but should be follow the specified min/max requirements.
- Max-Width: 768px
- Min-Height: 240px
Footer
Configure the footer heading and contact information.
Two menus can be added to the footer and will appear to the right of the Footer Contact Info. These menus can be configured at Appearance > Menus.
Footer Heading
Optionally add a heading to the footer. Will appear in the upper left-hand corner of the footer.
Footer Contact Info
Add address, phone number, email, etc. here. HTML can be used. An easy way to generate the HTML is to make the footer content in a Modern Campus (OmniUpdate) page and copy and paste it into WordPress. It is recommended to wrap content in paragraph tags (<p>) to provide proper line-height and spacing.
Sidebar
Provides two customizable sidebar fields that appear above and/or below widgets that are assigned to the sidebar.
Social Media Links
Configure the social media links that appear in the footer and in the sidebar (when the UND: Social Media Links widget is used).
Show Social Media Links
Checked by default. If unchecked, it will hide all instances of social media links on the site, including the footer and sidebar.
Social Media Links
Note that all social media links will open in a new tab/window, regardless of what is set in the WordPress admin.
Featured Posts Slider
Toggle display of an image slider with exactly four posts on the homepage of the site and configure which posts are displayed.
This is not available for homepages set to a specific page rather than Your latest posts or a Posts Page in General > Reading. Will always display exactly four posts.
Show Featured Posts Slider
Checked by default. If checked, the Featured Post Slider will be displayed on the homepage. When unchecked, the following Turn on Automatic Featured Posts and Featured Posts fields have no affect.
Turn on Automatic Featured Posts
Checked by default. If checked, the four most recent posts with a Featured Image will be displayed. If the system cannot find four posts with a Featured Image, then the Featured Post Slider will not be displayed.
Featured Posts
*Only available when Turn on Automatic Featured Posts is unchecked.
Enables the ability to curate a specific selection of posts to be showcased in the Featured Post Slider. There are a few rules regarding post selection with this feature:
- Only posts with a Featured Image will display in the image slider. In the selection tool, posts without a Featured Image will have a gray box to the left of the post title.
- Four posts must be selected.
Creating Posts and Pages
The UND Blog theme comes with a few customized post/page templates tailored to specific content needs.
Custom Post Templates
- Default: Two column layout, with right sidebar.
- Full-Width: Single column layout, no sidebar.
- No Sidebar: Two column layout, no sidebar content.
Custom Page Templates
- Default: Two column layout, with right sidebar.
- Archives: Two column layout, with right sidebar. Content column is two fixed lists of posts by month and by category. WYSIWYG content can be added prior to the two fixed lists.
- Full-Width: Single column layout, no sidebar.
- No Sidebar: Two column layout, no sidebar content.
Styled Content
Just like in Omni CMS, users can apply specialized styling to text and links that help bring attention to certain content. Do not overuse, or the elevated styling will become too “noisy” and lose its effectiveness.
The following three styles can be selected from the Formats dropdown of the WYSIWYG; Intro Text, (Link) Button, and (Link) Bold Underline.
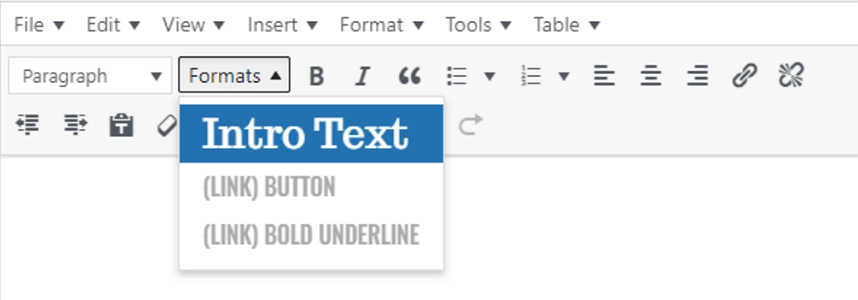 Intro Text
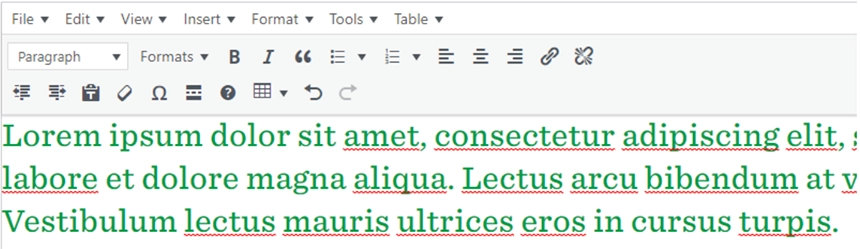
Creates a stylized intro sentence for a page/post using a green serif font.
The Formats dropdown will display the text as black in color, but once applied to text in the WYSIWYG, the text will be green.
(Link) Button
In WordPress, the styling will not appear when the link has focus in the WYSIWYG. Remove focus from link in WYSIWYG to see styling. To remove styling, select (Link) Button from the Formats dropdown.
(Link) Bold Underline
Creates a link with emphasized text and a bold underline. Must only be applied to a link.
In WordPress, the styling will not appear when the link has focus in the WYSIWYG. Remove focus from link in WYSIWYG to see styling. To remove styling, select (Link) Bold Underline from the Formats dropdown.
There are two versions of the stylized blockquotes, Basic and Cited.
Basic Blockquote
Uses the built-in WordPress Blockquote button in the first row of the WYSIWYG toolbar. Write your quote, highlight it, then click the Blockquote button. Optionally, italicize text within the blockquote to convert it to UND green.
Cited Blockquote
To add a cited blockquote, scroll past the WYSIWYG editor at the top of the Edit Post/Page screen until you find the Modules section. Click Add Module and you will be presented with two options, Blockquote and Visual Editor.
Select Blockquote
The cited blockquote has three fields, complete as many as desired. Save changes by clicking the post/page Update button.
If additional page content is required after the cited blockquote, select Add Module from the Modules section again, and select Visual Editor. Add remaining page content there. Save changes by clicking the post/page Update button.
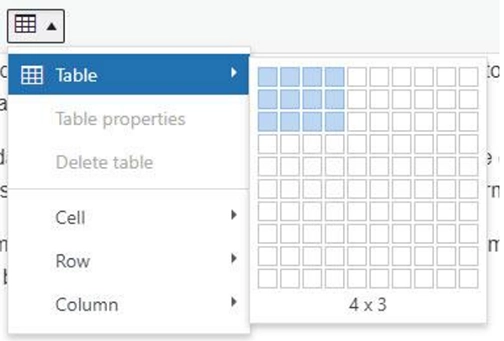
The default table that is inserted into the WYSIWYG requires a few steps of table configuration to ensure proper UND web branding. To add a table, select the table icon from the second WYSIWYG toolbar row. Select Table from the dropdown menu and then select the size of the table (number of columns and rows).
*All modifications to the table must be done through the table icon from this point on.
1. Insert the cursor into a table cell in the first row. Now select the table icon from the WYSIWYG, select Row, select Table Row Properties.
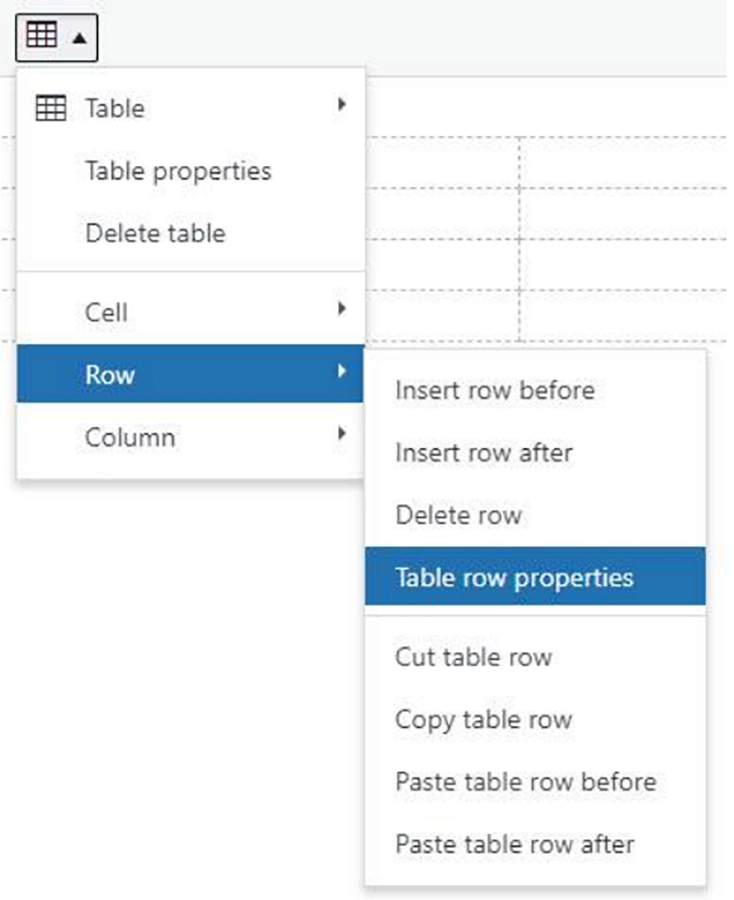 Example of modifying a table row.
2. In the Table row properties dialog, select Row Type and change it to Header. Click OK.
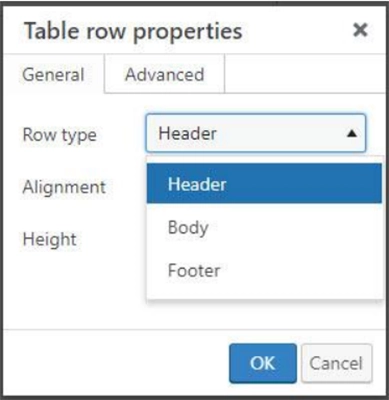 Example of setting a table row to Header.
3. Halfway there. Now all the table cells in the first row need to be heading cells. Select all the tables cells in the first row, these cells will be highlighted when selected. Now select the table icon in the WYSIWYG, select Cell, select Table cell properties.
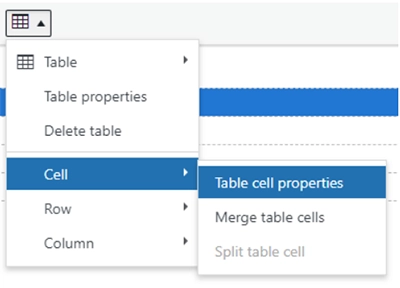 Example of modifying table cells.
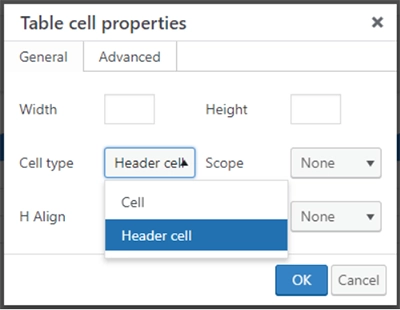
4. In the Table cell properties dialog, select Cell Type and change it to Header cell. Click OK.
5. Now verify that the first row has the proper heading structure. In the bottom lefthand corner of the WYSIWYG, the WYSIWYG displays the current location of the cursor within the HTML it has generated. If the prior steps have been successfully completed, the following should appear in the bottom left corner: TABLE » THEAD » TR » TH. If so, your table is properly formatted to provide better end user accessibility and a unified UND web presence!
If you see something other than THEAD for the second segment (first bolded item), retry changing the table Row Type to Header. If you see something other than TH for the fourth segment (second bolded part), retry changing the Cell Type for all table cells in the first row.